Mongo DB ,是目前在 IT 行业非常流行的一种非关系型数据库(NoSql),其灵活的数据存储方式,备受当前 IT 从业人员的青睐。Mongo DB 很好的实现了面向对象的思想(OO 思想),在 Mongo DB 中 每一条记录都是一个 Document 对象。Mongo DB 最大的优势在于所有的数据持久操作都无需开发人员手动编写 SQL 语句,直接调用方法就可以轻松的实现 CRUD 操作。
一、下载 mongodb
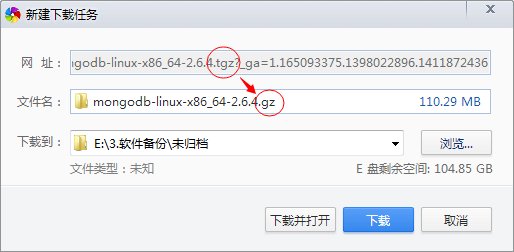
前往 mongodb 官网下载页面:https://www.mongodb.org/downloads下载相应的版本,比如目前的 Linux x64 位最新版:mongodb-linux-x86_64-2.6.4.tgz
不过有点坑爹是,下载链接明明是 tgz 格式,结果下载后变成了 gz 格式:
先下载看看好了。
二、解压 mongodb
[root@test6 ~]# gzip -d mongodb-linux-x86_64-2.6.4.gz
得到的是 mongodb-linux-x86_64-2.6.4,居然是个文件,而不是文件夹,和网上说的大相径庭: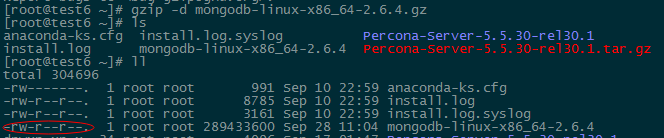
看来前面下载的确实存在问题!实际上应该是 tgz 文件才对,按经验分析了一下,下载的实际上还是 tgz 文件,显示为 gz 文件只是形式上的假象!所以,gzip 只解压了压缩包的外层,实际上还需要解压一层 tar 存档属性!
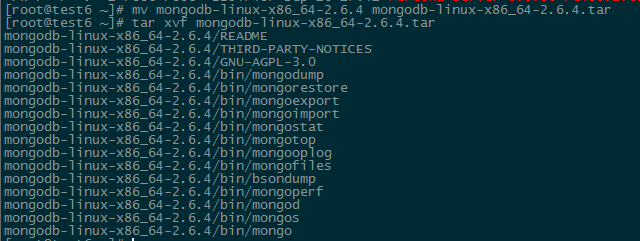
于是,先将解压后的文件重命名加上 tar 格式:
[root@test6 ~]# mv mongodb-linux-x86_64-2.6.4 mongodb-linux-x86_64-2.6.4.tar
然后,使用 tar 解压即可:
[root@test6 ~]# tar xvf mongodb-linux-x86_64-2.6.4.tar
将解压后的文件夹移动&重命名至/usr/local/mongodb
[root@test6 ~]# mv mongodb-linux-x86_64-2.6.4 /usr/local/mongodb
[root@test6 ~]# cd /usr/local/mongodb/bin/
[root@test6 ~]# ll
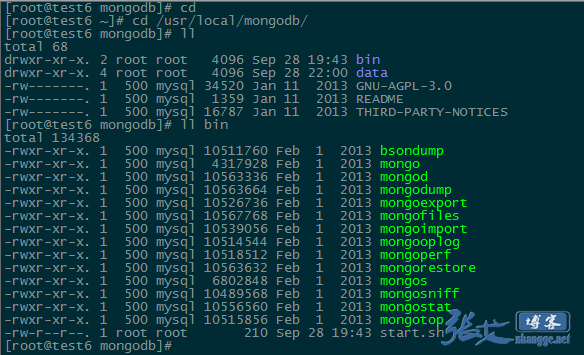
bin 下的 mongod 就是 MongoDB 的服务端进程,mongo 就是其客户端,其它的命令用于 MongoDB 的其它用途如 MongoDB 文件导出等。
三、启动 mongodb
启动前,先指定 mongodb 的 data 目录,如果没有就创建一个:
[root@test6 ~]# cd /usr/local/mongodb
[root@test6 mongodb]# mkdir data
然后,执行如下命令即可启动 mongodb:
[root@test6 mongodb]# /usr/local/mongodb/bin/mongod --dbpath=/usr/local/mongodb/data/ --logpath=/usr/local/mongodb/data/mongodb.log --logappend&

启动成功后,可查看是否启动成功了,默认端口号是 27017,当然在启动时也可以指定未使用的其它端口。

最后,将客户端 mogo 文件在/bin 下软链接,方便随处执行:
ln -s /usr/local/mongodb/bin/mongo /bin/mongo
 现在使用 mongo 客户端访问一下该数据库:
[root@test6 bin]# ./mongo
MongoDB shell version: 2.6.4
connecting to: test
>
安装成功!
四、附:基本操作
MongoDB 数据库基本用法

show dbs:显示数据库列表
show collections:显示当前数据库中的集合(类似关系数据库中的表)
show users:显示用户
use <db name>:切换当前数据库,这和 MS-SQL 里面的意思一样
db.help():显示数据库操作命令,里面有很多的命令
db.foo.help():显示集合操作命令,同样有很多的命令,foo 指的是当前数据库下,一个叫 foo 的集合,并非真正意义上的命令
db.foo.find():对于当前数据库中的 foo 集合进行数据查找(由于没有条件,会列出所有数据)
db.foo.find( { a : 1 } ):对于当前数据库中的 foo 集合进行查找,条件是数据中有一个属性叫 a,且 a 的值为 1
MongoDB 没有创建数据库的命令,但有类似的命令。
如:如果你想创建一个“myTest”的数据库,先运行 use myTest 命令,之后就做一些操作(如:db.createCollection('user')),这样就可以创建一个名叫“myTest”的数据库。
数据库常用命令

1、Help 查看命令提示
 help
  db.help();
  db.yourColl.help();
  db.youColl.find().help();
  rs.help();
2、切换/创建数据库
 use yourDB;  当创建一个集合(table)的时候会自动创建当前数据库
3、查询所有数据库
 show dbs;
4、删除当前使用数据库
 db.dropDatabase();
5、从指定主机上克隆数据库
 db.cloneDatabase(“127.0.0.1”); 将指定机器上的数据库的数据克隆到当前数据库
6、从指定的机器上复制指定数据库数据到某个数据库
 db.copyDatabase("mydb", "temp", "127.0.0.1");将本机的 mydb 的数据复制到 temp 数据库中
7、修复当前数据库
 db.repairDatabase();
8、查看当前使用的数据库
 db.getName();
 db; db 和 getName 方法是一样的效果,都可以查询当前使用的数据库
9、显示当前 db 状态
 db.stats();
10、当前 db 版本
 db.version();
11、查看当前 db 的链接机器地址
 db.getMongo();

Collection 聚集集合

1、创建一个聚集集合(table)
 db.createCollection(“collName”, {size: 20, capped: 5, max: 100});
2、得到指定名称的聚集集合(table)
 db.getCollection("account");
3、得到当前 db 的所有聚集集合
 db.getCollectionNames();
4、显示当前 db 所有聚集索引的状态
 db.printCollectionStats();

用户相关

1、添加一个用户
 db.addUser("name");
 db.addUser("userName", "pwd123", true); 添加用户、设置密码、是否只读
2、数据库认证、安全模式
 db.auth("userName", "123123");
3、显示当前所有用户
 show users;
4、删除用户
 db.removeUser("userName");

其他

1、查询之前的错误信息
 db.getPrevError();
2、清除错误记录
 db.resetError();

查看聚集集合基本信息

1、查看帮助  db.yourColl.help();
2、查询当前集合的数据条数  db.yourColl.count();
3、查看数据空间大小 db.userInfo.dataSize();
4、得到当前聚集集合所在的 db db.userInfo.getDB();
5、得到当前聚集的状态 db.userInfo.stats();
6、得到聚集集合总大小 db.userInfo.totalSize();
7、聚集集合储存空间大小 db.userInfo.storageSize();
8、Shard 版本信息  db.userInfo.getShardVersion()
9、聚集集合重命名 db.userInfo.renameCollection("users"); 将 userInfo 重命名为 users
10、删除当前聚集集合 db.userInfo.drop();

聚集集合查询

1、查询所有记录
db.userInfo.find();
相当于:select* from userInfo;
默认每页显示 20 条记录,当显示不下的情况下,可以用 it 迭代命令查询下一页数据。注意:键入 it 命令不能带“;”
但是你可以设置每页显示数据的大小,用 DBQuery.shellBatchSize= 50;这样每页就显示 50 条记录了。

2、查询去掉后的当前聚集集合中的某列的重复数据
db.userInfo.distinct("name");
会过滤掉 name 中的相同数据
相当于:select distict name from userInfo;

3、查询 age = 22 的记录
db.userInfo.find({"age": 22});
相当于: select * from userInfo where age = 22;

4、查询 age > 22 的记录
db.userInfo.find({age: {$gt: 22}});
相当于:select * from userInfo where age >22;

5、查询 age < 22 的记录
db.userInfo.find({age: {$lt: 22}});
相当于:select * from userInfo where age <22;

6、查询 age >= 25 的记录
db.userInfo.find({age: {$gte: 25}});
相当于:select * from userInfo where age >= 25;

7、查询 age <= 25 的记录
db.userInfo.find({age: {$lte: 25}});

8、查询 age >= 23 并且 age <= 26
db.userInfo.find({age: {$gte: 23, $lte: 26}});

9、查询 name 中包含 mongo 的数据
db.userInfo.find({name: /mongo/});
//相当于%%
select * from userInfo where name like ‘%mongo%’;

10、查询 name 中以 mongo 开头的
db.userInfo.find({name: /^mongo/});
select * from userInfo where name like ‘mongo%’;

11、查询指定列 name、age 数据
db.userInfo.find({}, {name: 1, age: 1});
相当于:select name, age from userInfo;
当然 name 也可以用 true 或 false,当用 ture 的情况下河 name:1 效果一样,如果用 false 就是排除 name,显示 name 以外的列信息。

12、查询指定列 name、age 数据, age > 25
db.userInfo.find({age: {$gt: 25}}, {name: 1, age: 1});
相当于:select name, age from userInfo where age >25;

13、按照年龄排序
升序:db.userInfo.find().sort({age: 1});
降序:db.userInfo.find().sort({age: -1});

14、查询 name = zhangsan, age = 22 的数据
db.userInfo.find({name: 'zhangsan', age: 22});
相当于:select * from userInfo where name = ‘zhangsan’ and age = ‘22’;

15、查询前 5 条数据
db.userInfo.find().limit(5);
相当于:selecttop 5 * from userInfo;

16、查询 10 条以后的数据
db.userInfo.find().skip(10);
相当于:select * from userInfo where id not in (
selecttop 10 * from userInfo
);

17、查询在 5-10 之间的数据
db.userInfo.find().limit(10).skip(5);
可用于分页,limit 是 pageSize,skip 是第几页*pageSize

18、or 与 查询
db.userInfo.find({$or: [{age: 22}, {age: 25}]});
相当于:select * from userInfo where age = 22 or age = 25;

19、查询第一条数据
db.userInfo.findOne();
相当于:selecttop 1 * from userInfo;
db.userInfo.find().limit(1);

20、查询某个结果集的记录条数
db.userInfo.find({age: {$gte: 25}}).count();
相当于:select count(*) from userInfo where age >= 20;

21、按照某列进行排序
db.userInfo.find({***: {$exists: true}}).count();
相当于:select count(***) from userInfo;

索引

1、创建索引
db.userInfo.ensureIndex({name: 1});
db.userInfo.ensureIndex({name: 1, ts: -1});

2、查询当前聚集集合所有索引
db.userInfo.getIndexes();

3、查看总索引记录大小
db.userInfo.totalIndexSize();

4、读取当前集合的所有 index 信息
db.users.reIndex();

5、删除指定索引
db.users.dropIndex("name_1");

6、删除所有索引索引
db.users.dropIndexes();

修改、添加、删除集合数据

1、添加
db.users.save({name: ‘zhangsan’, age: 25, ***: true});
添加的数据的数据列,没有固定,根据添加的数据为准

2、修改
db.users.update({age: 25}, {$set: {name: 'changeName'}}, false, true);
相当于:update users set name = ‘changeName’ where age = 25;

db.users.update({name: 'Lisi'}, {$inc: {age: 50}}, false, true);
相当于:update users set age = age + 50 where name = ‘Lisi’;

db.users.update({name: 'Lisi'}, {$inc: {age: 50}, $set: {name: 'hoho'}}, false, true);
相当于:update users set age = age + 50, name = ‘hoho’ where name = ‘Lisi’;

3、删除
db.users.remove({age: 132});

4、查询修改删除
db.users.findAndModify({
    query: {age: {$gte: 25}},
    sort: {age: -1},
    update: {$set: {name: 'a2'}, $inc: {age: 2}},
    remove: true
});

db.runCommand({ findandmodify : "users",
    query: {age: {$gte: 25}},
    sort: {age: -1},
    update: {$set: {name: 'a2'}, $inc: {age: 2}},
    remove: true
});
update 或 remove 其中一个是必须的参数; 其他参数可选。
参数
详解
默认值
query
查询过滤条件
{}
sort
如果多个文档符合查询过滤条件,将以该参数指定的排列方式选择出排在首位的对象,该对象将被操作
{}
remove
若为 true,被选中对象将在返回前被删除
N/A
update
一个 修改器对象
N/A
new
若为 true,将返回修改后的对象而不是原始对象。在删除操作中,该参数被忽略。
false
fields
参见 Retrieving a Subset of Fields (1.5.0+)
All fields
upsert
创建新对象若查询结果为空。 示例 (1.5.4+)
false

语句块操作

1、简单 Hello World
print("Hello World!");
这种写法调用了 print 函数,和直接写入"Hello World!"的效果是一样的;

2、将一个对象转换成 json
tojson(new Object());
tojson(new Object('a'));

3、循环添加数据
> for (var i = 0; i < 30; i++) {
... db.users.save({name: "u_" + i, age: 22 + i, ***: i % 2});
... };
这样就循环添加了 30 条数据,同样也可以省略括号的写法
> for (var i = 0; i < 30; i++) db.users.save({name: "u_" + i, age: 22 + i, ***: i % 2});
也是可以的,当你用 db.users.find()查询的时候,显示多条数据而无法一页显示的情况下,可以用 it 查看下一页的信息;

4、find 游标查询
>var cursor = db.users.find();
> while (cursor.hasNext()) {
    printjson(cursor.next());
}
这样就查询所有的 users 信息,同样可以这样写
var cursor = db.users.find();
while (cursor.hasNext()) { printjson(cursor.next); }
同样可以省略{}号

5、forEach 迭代循环
db.users.find().forEach(printjson);
forEach 中必须传递一个函数来处理每条迭代的数据信息

6、将 find 游标当数组处理
var cursor = db.users.find();
cursor[4];
取得下标索引为 4 的那条数据
既然可以当做数组处理,那么就可以获得它的长度:cursor.length();或者 cursor.count();
那样我们也可以用循环显示数据
for (var i = 0, len = c.length(); i < len; i++) printjson(c[i]);

7、将 find 游标转换成数组
> var arr = db.users.find().toArray();
> printjson(arr[2]);
用 toArray 方法将其转换为数组

8、定制我们自己的查询结果
只显示 age <= 28 的并且只显示 age 这列数据
db.users.find({age: {$lte: 28}}, {age: 1}).forEach(printjson);
db.users.find({age: {$lte: 28}}, {age: true}).forEach(printjson);
排除 age 的列
db.users.find({age: {$lte: 28}}, {age: false}).forEach(printjson);

9、forEach 传递函数显示信息
db.things.find({x:4}).forEach(function(x) {print(tojson(x));});
参考文章①:http://blog.csdn.net/ssyan/article/details/6927307
参考文章②:http://blog.chinaunix.net/uid-26558059-id-3211264.html


我一般都是先创建mongod.conf,把参数写在里面,然后启动的时候直接指定配置文件就行了。